There’s something about the original PS1 controller that just feels different.
Maybe it was the startup sound, maybe it was swapping memory cards at your mate’s house, maybe it was sitting cross-legged in front of a chunky CRT TV trying to beat a level of Crash Bandicoot without dying for the fifteenth time.
Whatever it was, the original PS1 controller was right there in your hands for all of it.
If you’ve got a broken PS1 controller lying around, instead of binning it, you can turn it into something genuinely cool — a wooden exploded display frame that shows every single internal component laid out in a clean, blown-up view.
This guide walks you through how to build one properly, step by step. If videos are better for you to follow then check out our video below:
Why the PS1 Controller Is Perfect for an Exploded Display
The original digital PS1 controller (model SCPH-1080) came with the first generation of the PlayStation. No analog sticks. No rumble. Just pure simplicity.
And that simplicity is exactly what makes it ideal for an exploded frame.
Inside, it’s:
- Clean and symmetrical
- Easy to understand
- Visually balanced
- Not overcrowded with modern tech
When you break it down and space everything out properly, it almost looks like a technical drawing from a design textbook.
But for most of us, it’s more than that.
It’s the controller we used to play:
- Crash Bandicoot
- Final Fantasy VII
- Metal Gear Solid
- Gran Turismo
- Spyro the Dragon
It was late nights trying to finish one more race, it was swapping discs halfway through a story game, it was arguing over who got to use the “good” controller.
Framing one is basically freezing that era in time.
We’ll go through exactly how to build your very own PS1 controller frame right now.
What You’ll Need
Materials
- A broken original PS1 controller (digital version is best)
- Deep wooden shadow box frame (A4 minimum, A3 recommended)
- MDF or plywood backing board
- Wood stain or matte paint (optional)
- Strong clear adhesive (epoxy works well)
- Clear spacers (acrylic rod, plastic standoffs, or small dowels)
- Optional acrylic front cover
Tools
- Small Phillips screwdriver
- Tweezers
- Sandpaper
- Ruler
- Pencil
You can usually find faulty PS1 controllers cheaply online or in retro shops, ebay or cex are usually easiest to find these.
Step 1: Disassemble the PS1 Controller

Start by flipping the controller over and removing the six rear screws.
Gently separate:
- Back shell
- Front shell
- PCB board
- Rubber membranes
- D-pad
- Face buttons
- Start and Select buttons
- Cable and strain relief
- All screws
Take your time. The plastic is old now and can be brittle.
Once fully dismantled, clean each part with a dry cloth. Don’t soak anything, especially the PCB.
Lay everything out on a table so you can see all the components clearly.
This is usually the moment you realise how simple these controllers really were.
No sticks. No vibration motors. Just a straightforward board and conductive membranes.
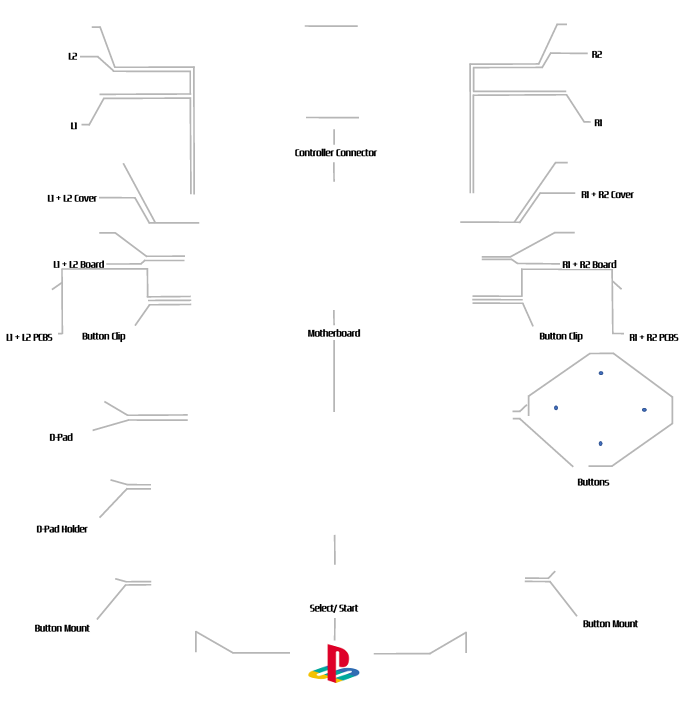
Step 2: Plan the Exploded Layout Properly
This is the part that makes or breaks the project. We have a perfect outline for you to follow here for free!
Don’t glue anything yet.
Lay the parts out first and experiment.
The key is to think in layers:
- Front shell at the front
- Buttons and D-pad positioned where they normally sit
- Rubber membranes slightly behind them
- PCB aligned behind that
- Back shell at the very rear
- Cable extending naturally from the top
You’re essentially pulling the controller apart along its natural axis and spacing each layer out.
Spacing Guide
Leave around 10–20mm between layers.
Too tight and it looks flat.
Too wide and it looks messy.
Keep everything centred and symmetrical. The PS1 controller design is very balanced — your layout should reflect that.
Use a ruler.
Take a photo once you’re happy before moving on.
Step 3: Prepare the Wooden Frame

Choose a shadow box frame with at least 40mm depth. You can build a simple frame yourself and follow our instructions here or you can purchase a frame from places like hobbycraft in the UK.
Anything shallower and you won’t get the proper blown-up look.
Before mounting anything:
- Lightly sand the backing board
- Paint or stain it if you want
- Let it dry fully
Background Colour Ideas
- Matte black – modern contrast against grey controller
- Natural wood – warmer, slightly retro feel
- Walnut stain – premium but still subtle
Keep it minimal. The controller should be the focus.
Step 4: Creating the 3D “Floating” Effect
If you just glue parts directly to the backing board, it won’t look like a true exploded display.
You need spacers.
Best options:
- Clear acrylic rods
- Plastic PCB standoffs
- Thin wooden dowels painted to match background
The process:
- Glue spacer to backing board
- Let it cure
- Glue controller part to top of spacer
This gives real depth and shadow, which makes the whole thing look far more professional.
Work from back to front.
Step 5: Mounting Order (Important)
Glue in this order:
- Rear shell
- PCB
- Rubber membranes
- Buttons and D-pad
- Front shell
- Cable strain relief
- Screws (placed neatly last)
Placing screws evenly near their original positions looks incredibly clean.
Use tweezers for small parts.
Less glue is always better. Excess adhesive will ruin the aesthetic.
Let everything cure for 24 hours before assembling the frame fully.
Making Your PS1 Controller Frame Look Clean Rather Than DIY
A few small details make a huge difference:
- Keep spacing consistent
- Align everything vertically
- Centre the controller perfectly
- Avoid fingerprints on inside of glass
- Don’t overcrowd the layout
You can also add small printed labels if you want a technical diagram feel, but it works just as well completely minimal.
PS1 Controller Frame Size Recommendations
| Layout Style | Recommended Frame |
|---|---|
| Compact layout | A4 |
| Spacious layout | A3 |
| Deep layered look | 50–60mm shadow box |
A3 gives the controller space to breathe and feels more like proper wall art.
Estimated Cost (UK)
| Item | Cost |
|---|---|
| Broken PS1 controller | £5–£15 |
| Shadow box frame | £20–£40 |
| Adhesive | £5–£10 |
| Spacers | £5 |
Total: roughly £35–£70 depending on materials.
Considering how much retro tech wall art sells for, it’s a solid DIY project for the price.
Why the PS1 controller Era Still Means Something
There’s a reason people still talk about PS1 games.
It was:
Cinematic storytelling with Final Fantasy VII.
Stealth gameplay becoming mainstream with Metal Gear Solid.
3D platformers with Crash Bandicoot and Spyro.
Realistic racing feeling real with Gran Turismo.
For a lot of us, it was the first time games felt big.
The controller itself reflects that simplicity.
No over-complication, no constant updates, no patches.
Just put the disc in and play.
Holding a PS1 controller reminds you how far gaming has come — and how good it already was back then.
Where to Display your PS1 controller frame
Once finished, your exploded PS1 controller frame works perfectly in:
- A gaming room
- Office space
- Streaming setup
- Bedroom wall
- Retro-themed corner
Final Thoughts
Building a PS1 controller exploded frame isn’t complicated, but it does require patience and precision.
The key points:
- Plan your layout carefully
- Use spacers for depth
- Keep alignment clean
- Don’t rush glue curing time
What you end up with is more than a broken controller mounted on wood.
It’s a small piece of gaming history, laid out in full view.
And every time you look at it, you’ll probably hear that startup sound in your head.
Leave a Reply